AUD110 – Compositional Analysis

Introduction

In this Blog post I will outlining a Audio Structural Map of the classic 90’s song “All the Small Things” (ATST) by the pop/punk band ‘Blink-182’. Recording at the trailing edge of 1990 and released as the opening of the new millennium, it was the standout track on the album “Enema of the State”. This post will break down and discuss the track’s Key, Time Signature, BPM (Beats per minute), and general compositional structure.

To begin with, ATST features a quick allegro tempo, set in a key of C at a typical timing of 4/4, while the BPM hovers around 150 at most times. In the version of the track analysed, the same track on which it originally charted in the United States, the instruments and vocals featured in the track include 2 Electric Guitars (Main & Backing), Drums, Main Vocals and Backing Vocals.

Similar to many songs of its generation, the structure of ATST follows a rather generic order. Beginning with the Instrumental Intro, the song then drops straight into the first Verse 1, followed by Verse 2, the Bridge, then next the Chorus, and followed up again by another Instrumental segment. After this, Verse 3 plays and is again followed by the Bridge, the Chorus once more and then the Instrumental one more time to form a simple loop of sorts. With the Outro that plays out the track, it is divided into two sections, the final Bridge and Verse 4, which repeats a single time and then concludes with a large ‘Fade-out’.


Section: Intro (Instrumental)

Time: (0.00-0.14)

Bars: (1-10)

The track beings with the opening Instrumental piece, with the dual Electric Guitars beginning just shy of the Bass that plays in the background beat, and Drums then joining the Guitars after a brief pause and continuing together for the remainder of the Intro. The Electric Guitars continue to play a Cycle Riff that follows the chord progression of ‘C-G-F-G (1,4 & 5 of C), all whilst the Bass Guitar follows on the C when the Electric Guitars shift to a key of F.


Section: Verse 1

Time: (0.14-0.27)

Bars: (10-18 )

The chord progression of the Electric Guitars in the track from the initial Intro then continue into the opening Verse, as does the lone Bass Guitar. The tone of this section of the track shifts to what is known as “Mezo-forte”, which roughly translates as “moderately loud”. It is during this Verse that the first vocals are introduced to the track, which play as follows:

“All the small things

True care, truth brings

I’ll take one lift

Your ride best trip”


Section: Verse 2

Time: (0.27-0.39)

Bars: (18-25)

The general chord progression of both Guitars (Electric & Bass) then continues into the second Verse in a somewhat similar order to the first Verse, with the “Mezo-forte”-esq tempo continuing on. The Backing Vocals of the track are then introduced in Verse 2, which play as follows:

“Always I know

You’ll be at my show

Watching, waiting,

Commiserating”


Section: Bridge

Time: (0.39-0.45)

Bars: (25-29)

As the Bridge begins, the Electric Guitars each strum a single chord on C, which is then held while the Drums continue as before. All the while, the level on gain on the Vocals rises to sing the vocal elements of the Bridge. While this is happening, the track’s tempo slows down to approximately 145 BPM and shifts to “Forte”, which translates to mean “strong”. The vocals of the Bridge play as follows:

“Say it ain’t so,

I will not go,

Turn the lights off,

Carry me home”


Section: Chorus

Time: (0.45-0.59)

Bars: (29-38)

As the Chorus begins, the vocals of the Lead Singer come to a stop, with the focus instead turning to the Backing Vocals. With the Chorus the same vocal dialogue is repeated 4 times, and at the same time the BPM rate rises once more to 150, and the tempo returns again to “Mezo-forte”. The Drums are unaffected during the Chorus, however the chord progression on the Electric Guitars returns to what it originally was during the Intro of the trach. The Backing Bass Guitar however plays a series of inversion chords during the entirety of the Chorus. The vocals of the Chorus play as follows:

“Na-na, na-na, na-na, na-na, na-na

Na-na, na-na, na-na, na-na, na-na

Na-na, na-na, na-na, na-na, na-na

Na-na, na-na, na-na, na-na, na-na”


Section: Instrumental

Time: (0.59-1.12)

Bars: (38-45)

In the Instrumental section that begins almost a minute into the track, all vocal elements disappear along with the Backing Guitar. All that is left is the Lead Guitar and Drums, which play the exact same chord progression as during Intro, except with chord inversions that occur throughout the section in multiple places.


Section: Verse 3

Time: (1.12-1.25)

Bars: (45-54)

As with the second Verse, the general chord progression of both Guitars (Electric & Bass) then continues into the third Verse in similar order to the second Verse, with the “Mezo-forte”-esq tempo continuing on. A new set of Backing Vocals of the track are then introduced in Verse 3, which play as follows:

“Late night, come home

Work sucks, I know

She left me roses by the stairs,

Surprises, let me know she cares”


Section: Bridge

Time: (1.25-1.31)

Bars: (54-58)

This Bridge plays exactly as the one that earlier preceded it. As the Bridge begins, the Electric Guitars each strum a single chord on C, which is then held while the Drums continue as before. All the while, the level on gain on the Vocals rises to sing the vocal elements of the Bridge. While this is happening, the track’s tempo slows down to approximately 145 BPM and shifts to “Forte”, which translates to mean “strong”. The vocals of the Bridge then again play as follows:

“Say it ain’t so,

I will not go,

Turn the lights off,

Carry me home”


Section: Chorus

Time: (1.31-1.44)

Bars: (58-66)

Like before, as the Chorus begins, the vocals of the Lead Singer come to a stop, with the focus instead turning to the Backing Vocals. With the Chorus the same vocal lyrics are repeated 4 times, and at the same time the BPM rate rises once more to 150, and the tempo returns again to “Mezo-forte”. The Drums are unaffected during the Chorus, however the chord progression on the Electric Guitars returns to what it originally was during the Intro of the trach. The Backing Bass Guitar however plays a series of inversion chords during the entirety of the Chorus. Once again, the vocals of the Chorus play as follows:

“Na-na, na-na, na-na, na-na, na-na

Na-na, na-na, na-na, na-na, na-na

Na-na, na-na, na-na, na-na, na-na

Na-na, na-na, na-na, na-na, na-na”


Section: Instrumental

Time: (1.44-2.10)

Bars: (66-82)

As with the earlier featured Instrumental section, all vocal elements disappear along with the Backing Guitar. Drums are given less of an emphasis to begin with as well, almost fading into the background for a while. The tempo also drops dramatically (below 100 BPM) during the start of this Instrumental, however it ramps right back up towards the end to match the 145 BPM of the Bridge that follows.


Section: Bridge

Time: (2.10-2.17)

Bars: (82-86)

This Bridge plays exactly as those that earlier preceded it. As the Bridge begins, the Electric Guitars each strum a single chord on C, which is then held while the Drums continue as before. All the while, the level on gain on the Vocals rises to sing the vocal elements of the Bridge. While this is happening, the track’s tempo slows down to approximately 145 BPM and shifts to “Forte”, which translates to mean “strong”. The vocals of the Bridge then again play as follows:

“Say it ain’t so,

I will not go,

Turn the lights off,

Carry me home”


Section: Verse 4

Time: (2.17-2.23)

Bars: (86-90)

Again, as with the third Verse, the general chord progression of both Guitars (Electric & Bass) then continues into the forth Verse in similar order to the third Verse, with the “Mezo-forte”-esq tempo continuing on from the Bridge before it. A new set of Backing Vocals of the track are then introduced in Verse 4, which play as follows:

“Keep your head still,

I’ll be your thrill,

The night will go on,

My little windmill”


Section: Bridge

Time: (2.23-2.30)

Bars: (90-94)

Once again, this Bridge plays exactly as those that earlier preceded it. As the Bridge begins, the Electric Guitars each strum a single chord on C, which is then held while the Drums continue as before. All the while, the level on gain on the Vocals rises to sing the vocal elements of the Bridge. While this is happening, the track’s tempo slows down to approximately 145 BPM and shifts to “Forte”, which translates to mean “strong”. The vocals of the Bridge then again play as follows:

“Say it ain’t so,

I will not go,

Turn the lights off,

Carry me home”


Section: Verse 5

Time: (2.30-2.38)

Bars: (94-99)

With Verse 5, the only differences between it and Verse 4 are the addition of an extra lyric (the second last line is now repeated), and the strange shift in key that occurs in the final few moments of the Verse. The slightly modified version of the Verse 4 lyrics are featured in Verse 5, which play as follows:

“Keep your head still,

I’ll be your thrill,

The night will go on,

The night will go on,

My little windmill”


Section: Fade

Time: (2.38-2.48)

Bars: (99-105)


REFERENCES:

 Geffen Records. (2009). Retrieved from https://www.youtube.com/watch?v=9Ht5RZpzPqw


Acoustic Investigation (AUD110)

Introduction

The concept of Sound is a unpredictable and erratic phenomena, especially when considering the limitations of human sound perception. All environments are different in the realm of Sound, with the mechanics of individual rooms fundamentally altering Sound as it moves throughout an area, with a Sound in one area of a room often sounding remarkably different than in another part of the same room.

For recording engineers, this represents a difficult and often debilitating problem, and one that must be considered on a room by room basis. Regardless of recording equipment on hand, if one fails to understand how Sound propagates in a volume, then their ability to effectively record professional Sound is extremely diminished. The purpose of this blog is to analyse a room, study its recording properties, and access its usefulness as a recording environment.


Room Overview

The room chosen for this analysis is the 1.4A Edit Suite Studio, located on the SAE QANTM Campus in Brisbane, Australia. It is a small room, primarily constructed of concrete, with a carpeted floor and plastered ceiling. The concrete walls have been plastered over, as well. A ventilation duct cuts across the room’s ceiling, as well as a section of the building’s electrical wiring.

  • Dimensions – Height: 4.20m, Length: 3.00m, Width: 2.60m
  • Volume – 21.84m3

The room contains various pieces of equipment and furniture. On a wooden desk against the back wall there is a small Mixing Console, as well as two raised Audio Monitors. A standard office chair is located in front of the desk, and is flanked by a small chair on the right hand side of the room, and a wooden shelf under the window. One shelf is empty, while the right hand side contains small equipment. A Mac Pro computer (with a a trio of PC monitors used as a displays) is located on the mixing desk, complete with accompanying devices and accessories. The walls feature and arrangement of fabric panels, placed in order to acoustically treat the Studio.

The room is actively cooled by a vent located in the side of the ventilation duct that cut through the ceiling of the room, which unfortunately produces a low-frequency but ongoing background hum. This has the negative effect of raising the noise floor of the room considerably when measured on a microphone, especially when compared against similar rooms without ducted air conditioning.

Apart from its concrete foundations, the room features a single wooden entry door and a large sized glass viewing window to the side of the door, together taking up a considerable amount of one wall of the Studio. The entry door also features a small embedded glass window, although one much smaller than the one beside the door.


Recording

For the purposes of measuring the Sound within the room, 3 individual hand-claps were recorded in different positions throughout the room using the built-in microphone of a Samsung S5 Smartphone. Time was allowed after each clap in order for the Sound to decay in the room, and each clap was recorded individually approximately 1m away from the source of the recording, which was located on the mixing desk.

Clap Recordings

The first clap (Clap 1) was done in the centre of the room, standing in line between the door and viewing window. The second clap (Clap 2) was conducted the the left hand corner of the left, opposite the mixing desk, and the third clap (Clap 3) was done in the right hand corner opposite it.


Observation of Background Noise

The room suffers from a high degree of audible background noise. The ventilation duct produces and ongoing hum, presenting itself as a low-frequency mechanical hum, exacerbated by the Sound of flowing air coming into the room from the vent itself. When measured on a DSLM (Digital Sound Level Meter), the noise floor of the room reached 44dBA on average. Although the room is situated across from an open study area and directly opposite another Studio room, no observable amount of noise pollution could be observed.


Observation of Frequencies

Frequencies throughout the Studio were a mixed bag, with higher frequencies coming through clearly, whilst most low to middle range frequencies not captured as effectively. This can primarily be pinned down to the limited dimensions of the Studio, combined with the surface materials of the room itself. The carpeting on the floor and fabric panels that line the walls would likely contribute to mostly higher frequencies being reflected.

The Sound of claps in the Studio was far sharper than in larger surrounding rooms. The limited decay in the Sound by the time it is reflected back from the surrounding walls created an amplified Sound, a quality that can be seen as a considerable deterrent if a recording engineer intends to enact tight controls over the level of tones for Sounds in the Studio.


Observation of Reverberation Time

Due to its small dimensions, the Reverberation Time inside the Studio is extremely short, with the average RT-60 for the room coming to only 238ms. The only really observable Reverberations in the Studio were confined to the high-frequencies, and depending on the placement of microphones in the Studio could potentially cause some minor slap-back echo delay to occur. This however is dependent on the instruments or equipment being recorded, due to a longer delay time (75 to 250 milliseconds) for slap-back echo to occur.


Observation of Sound Location Recording

Due to the limitations of the microphone built into the older Samsung S5, the recordings made make it difficult to discern a great difference in the level of tones from each of the recording locations, with the change of timbre in the tone of each clap being difficult to pick up. As a result, the location of each clap also failed to exhibit much of a difference on the sound recorded for each. In should be noted that the device used for recording remained fixed and stationary throughout each clap, with only the location of the clap changing, and the clap always directed towards the recording device.

With the first clap (Clap 1), the Sound appears to be stronger and more focused on the middle frequencies that the following two claps. This was not immediately apparent due to the quality of the recording, but could be ascertained after multiple listens. The second clap (Clap 2) comes across as deeper and hollower in tone, although it contains slightly more high frequencies than the first clap. While it was expected that the third clap (Clap 3) would sound roughly identical to the second clap due to a similar location in the Studio, it actually came across as resembling more low to middle range frequencies. When listened to carefully, the third clap appears to contain elements of both the previous claps, almost serving as a mixing of the two together. It is unknown as to why the tone and frequencies of the third clap came to be so different to the second clap, especially considering its similar location in the Studio.


Surface Material Responses

Because of the room’s small footprint, combined with surfaces lined with either plaster, carpet, or glass, it is notorious for capturing high-frequencies during recording. In addition, the metal ventilation duct and electrical wiring panels that line the ceiling are constructed of materials that work well to reflect Sound in the higher frequencies. The large Glass Window, as well as the smaller Embedded Window in the Door are also materials that fail to adequately reflect the lower frequency range, with low frequency tones passing through with little resistance, however they in return are extremely effective at reflecting the higher frequency bands in return.

Although clearly visible, the fabric panels that adorn the walls of the Studio have little impact on Sound absorption around the room, instead acting primarily to reduce the overall Reverberation that can occur in the room. While it is not eliminated in any sense, its likelihood of occurring under normal recording conditions is reduced significantly. They would likely manifest as much louder should the fabric panels be removed. As mentioned earlier, slap-back echo is a risk in a Studio of this kind, and their removal would likely endanger the room’s already questionable acoustics even further.


Conclusion

For the purposes of solely recording Sound in, the 1.4A Edit Suite Studio is a poor substitute for a larger proper Studio. Even before a detailed analysis, the level of background noise pollution is simply awful, and its limited dimensions make any recording that requires precise control over a wide range of recorded frequencies an impossible task.

While the Studio could still be considered as adequate for the recording of light vocals, its response to low-middle range frequencies still make it a far from ideal option, especially when far better locations for recording Sound exist on the Campus, even outside of the other dedicated Sound Studios.

The room’s only saving grace is that it still serves as workable environment for closed Sound mixing, while utilising headphones rather than studio monitors. With a Junction Box and a link-up to another recording environment, it does have the potential to serve as a rather good Sound Mixing Room, despite its limited size. However, as Studios with dedicated Sound Mixing Rooms already exist on Campus, this option practically falls on deaf ears.


References

Everest, F., & Pohlmann, K. (2015). Master Handbook of Acoustics (6th ed.). New York: McGraw-Hill.
Owsinski, B. (2013). The Recording Engineer’s Handbook (3rd ed.). Australia: Cengage Learning.
Ethan Winer. (2003). Acoustic Treatment and Design. Retrieved 02/11/2017 from: http://ethanwiner.com/acoustics.html

Studio 3 – ‘Flow’ Post Mortem

Overview:

This Postmortem will reflect the development of the Unity-based application ‘Flow’, created as part of the Client Project for Studio 3. In this Postmortem a number of key elements of both the Conceptual Design and Development processes will be broken down and examined in detail.


Project Summary:

The primary goal of the Client Project was to a create an educational application to “allow Players to practise the concepts of Signal Flow outside of the Studio Environment”. Although its development was plagued by problems during development, I believe that the final product meets the requirements set by the Client, despite its clearly less than polished presentation. Conceived and developed over the course of approximately thirteen weeks, ‘Flow’ delivers the experience of providing a digital environment that serves as an abstract representation of a Audio Studio, allowing Players to practise the concepts of Signal Flow without the need for access to physical facilities.

The delivered application meets much of design criteria conceived during the Conceptual Design Phase, based on the Requirements gathered during the initial Client Meeting, and featuring changes and updates to game-play based on feedback gathered during play-testing and feedback received from the Client over the course of the trimester. Although still suffering from several problems and lacking a certain amount of polish, the final product was reviewed by and accepted for delivery by the Client during Week 13.


Time Management:

Time Management was an issue that impacted the entire team during development, and is a joint contributor as to why our final product is not the polished and feature-complete experience that was promised to the Client during the initial Client Meeting. Unlike the other three Designers on the team, I had no official title or Role assigned to me for this project. I actually found this to be a godsend, as I was already the Project Manager for a CIU group this trimester, while also dealing with a number of external commits.

As the trimester began I made considerable effort to shed myself of distractions and commitments in order to better focus on the requirements of this project, however as time went on I found myself being stretched more and more between my various commitments. As a result, my personal Time Management for the project was negatively affected. Although steps were taken in the second half of the trimester in an effort to remedy this situation, it was never entirely resolved.

The biggest issue I faced early on was Family Commitments, many of which conflicted with the days I had class on campus each week. On Tuesdays I had a baby sister to drop to school some weeks, which forced my daily commute to the campus to be pushed back at least an hour. Limiting the amount of time I was on campus, I was often forced to play catch-up with the rest of team. When it became apparent that this delay was affecting my performance and ability to contribute effectively, I made arrangements to ensure that another adult would be able to drop her to school from then onward.

Illness early in the trimester also negatively affected my ability to contribute to group work and discussions. Despite this, this was an issue that grew to affect each and every group, as several rounds of the Flu meant that it was rare that all members of any one team were on campus at one time. Each member of our team missed at least a single class due to illness during production, and was in reality a problem that could not be avoided.

The single largest contributor to my poor Time Management was attention being drawn away from the project and instead focused on the CIU Final Project. Despite only being a 10 credit point unit, more and more of my time and focus each week was gradually eaten up by Final Project. Eventually it got to the point that for every 3 hours I was putting into Final Project, only 1.5 hours was going into the development of ‘Flow’. This was because I failed to delegate tasks as effectively as I should of with Final Project, causing my weekly workload to balloon and limiting the amount of attention that could be directed in the game at hand.

I should have done more to redress this balance in hours earlier on, and it reflects poorly on my own personal Time Management ability as a Game Designer. Although we all came together in the final two weeks of production and each gave the project our full effort and attention, it is clear that we would have been in a far better position had we put more effort into handling our group and personal Time Management more effectively.

For the future there are a range of actions to be followed:

  • A personal Work Calendar must be set up and strictly adhered to for the duration of the trimester.
  • Positive Work Habits need to be ingrained in my everyday Schedule. 
  • Production & Studio-related Activities need to take absolute priority, with personal and other external commitments put on the back-burner.
  • Milestones and Delivery Dates for Assessment/LOs need to set out in advance.
  • Work hours need to be set out on a daily basis, with breaks for entertainment and personal activity planned amongst periods of Study.
  • Hack’n’Plan tasks should be integrated into my personal Schedule on a regular basis (daily if possible).
  • I need to find additional for and acquire a White-board to hold my current Tasks.


Version Control:

For this project, our team made use of Source Tree and GitHub for managing our various project files & assets  over the course of development. This was a process that began well and with the best of intentions, however as production crept into the second half of the trimester it gradually became clear that our team suffered from a number of deficiencies related to Version Control. Although these problems would be addressed for the most part by the end of the project, they caused significant delays during production, delays that could have been avoided had proper source management procedures been followed.

Throughout development, very minor merge conflicts were a somewhat regular occurrence on the Design side of the project, however nothing substantial was lost during these events, and usually they were quickly resolved and work continued. Problems did however begin to arise later in development when it came time to begin migrating features created by the Programmers on their repo into the Design repo. This itself was the ‘Achilles Heel’ of Version Control with our project, the very fact that we were working in two entirely separate repos on the project. Instead of working in a single Master repo and breaking up Programmer and Design work into separate Forks, we created a burden for ourselves by forcing files to be manually added to the Design repo by hand, a tedious and often dangerous task that was plagued with risk of data-loss thanks to files being written over. The very process of moving these files over manually from one repo to another actually worked against the very concept of good Version Control.

Although problems existed with knowledge gaps between the Designers and Programmers on the subject of Signal Flow, I believe that the issues with and our very approach to Version Control was the primary contributor to the delays and production problems that held back ‘Flow’ and prevented us from delivering a polished and truly feature-complete build to the Client at the end of Week 13. Although in the end lessons were learned, problems were overcome, and other issues were mitigated to some extent, it is obvious that the approach that our team took to handling Version Control was flawed from the very beginning.

For the future there are a range of actions to be followed:

  • The greater Team must all be using a single Repository for Source Control, with individual areas of development broken up into Forks.
  • Each major Feature should preferably have its own Branch in the Repository.
  • Uncommitted changes should be Stashed when it is known that other developers will be interacting with the same code/feature/content.
  • Each Team Member should be up to speed and have a clear understanding of how to use Pull Requests, how to Merge Changes between Branches, and how to Re-Base a Commit.
  • Team Members should make themselves familiar with a variety of different Git Clients (eg. SourceTree, Git for Windoes, GitKraken etc).
  • The Log for each new Commit must contain a complete and accurate description of the changes made, rather than a single tagline that reads as ‘Update’.


External Collaboration:

At the start of the Project, a strong conscious effort was made to attract External Collaborators from the Audio and Design disciplines to help build the various elements of the application. Unlike with previous Studio projects, we had to source these Collaborators ourselves, pitching our game concept to them in an effort to encourage them to come on board the project. We reached out to these Collaborators in an effort to inject additional outside talent into the design of ‘Flow’, as well as to add an additional degree of professional polish to the project. In the end we were able to successfully obtain the services of one Audio & one Design Collaborator.

With access to Audio and Design students, we now had access to Collaborators who could create professional Audio & Design Elements. These Audio Elements would take the form of SFX (Sound Effect Elements), which would be used for representing the sounds of Nodes and other Player interactions during game-play. For Design Elements, these would take the shape of 2D Icon Art assets for each of our Nodes in the game, allowing each Node to easily identifiable and distinct from its surrounding Nodes. This significantly reduced the amount of potential work we would have to do ourselves, and allowed us the ability to keep the Scope of the game open to some extent (although reductions to the Scope would later have to be made). By linking the Collaborators up to the Shared Google Drive, they were able to upload and store the Assets they created without having to meet in person or deal with large files over email.

Although organising a Design Collaborator has a relatively simple affair, we made the mistake of leaving acquiring an Audio Collaborator until the last few weeks of Production. In order to address this, I had to personally reach out to several Audio Students (who were each already involved with multiple projects) in an effort to elicit their assistance with ‘Flow’. Thankfully I was able to encourage Misty-lee to join our team as an external collaborator, and was able to deliver to her an Audio Asset List the very same day. She was then able to produce each of the SFX elements we required in a short and timely fashion. Although we were not able to utilise all of the Sounds she created for us, the majority of Audio Elements that are featured in the final version of the game are based on Misty’s work, replacing the temporary audio elements I had created before. The Audio Elements that Misty provided would prove essential in creating the interactive feel of the experience, coupled with the distinct different feeling each Node has based on the sound it emits.

The process of working with External Collaborators on the Client Project was executed well, despite the delays in signing on all required collaborators that occurred. Although some minor mistakes were made such as issues with infrequent communication, delays in providing complete Asset Lists early on, and final delays with the production of 2D Icon Assets, in the end all of these problems were eventually overcome. For each of the mistakes made, lessons were learned and problems were overcome.

For the future there are a range of actions to be followed:

  • The Team should ensure that all External Collaborators ‘have access to/are actively using’ the Communication channel that is being used to communicate with the rest of the Team.
  • When exhibiting future Projects, Collaborators should be given more ample time & notice of when their work will be on display (eg. Exhibitions, released Online).
  • Frequent feedback should be provided to Collaborators on each Asset they create for the Team.
  • When giving Feedback in future Projects, it should always be useful, constructive, and delivered in prompt fashion.
  • Assets Lists for Collaborators should be provided as early as possible during Production, and be kept up to date with changes that occur to the Project.


Conclusion:

Although a consider number of problems and missteps occurred during the course of developing ‘Flow’, I can honestly state that the experience was a positive one that resulted in a final product that we can each be proud of, even if it is still somewhat incomplete. It does however achieve what we set out to achieve, it serves as a functionally complete Prototype of a Signal Flow application that has the very real potential to be taken further.

Each Team Member stepped forward and put in a complete effort in the final days of the project to see that the final product was one they could be proud to have been a part of developing, Designers and Programmers alike. Each put in the extra hours required, and in the end the product was one that the Client could look at and gladly sign off on.

Studio 3 – Educational Games & Contractors

Part of the process of research for the development of ‘Flow’ has been learning to better understand the various different ways in which Games exist in a commercial marketplace. To achieve, we first need to gain a better understanding of what defines the commercial marketplace, as the bounds of what makes up the commercial market is not universally agreed on.

The term ‘Commercial Market‘ usually refers to the sale of products and services to end users and public and private companies, but not to governmental agencies. The term is used to contrast non-government buyers from government buyers. It is the sale of products and services to end users, but not to manufacturers, distributors or OEMs. The term is used to contrast retail buyers from wholesale buyers.

Within this commercial market, Games are usually sold in one of several fashions. The oldest and most traditional way is through single sale at Retail (brick & mortar), followed up by single sale licensing on Digital Online Storefronts such as Steam or itch.io. Although far less common now and superseded by the concept of Micro-transactions, Shareware has also been a potential avenue for developers to get Players to try out and purchase their games by giving them a sneak peak at the action. Popularised by then fledgling game development companies such as Apogee Software and Epic MegaGames (now 3D Realms and Epic Games respectively), this approach to putting games on the commercial market indirectly led to the rise of Game Demos becoming a staple in the industry.

For the purposes of Studio 3, what was more important to us was how Educational & Learning Game Developers exist in the commercial marketplace, especially as Contractors. As Education-based Games make up a very specific sub-set of the Games Market, most development work is Contract based. Government agencies and Education Institutions are typical Clientele who make require the development of Educational Games, and seldom do they use or possess any form of in-house talent. This is where contractors come in.

Most students who graduate from with a Games Degree immediately go on to become Freelance Designers & Contractors, rather then working directly for a Games Studio.

The Clients Requirements for Educational Games towards contractors are usually quite specific and generally strict. An Educational Game is often expected to fit within the bounds of a learning framework, and is at times even subjected to review and scrutiny from those higher up the food-chain. It may be required to deliver a very specific message to Players, often word-for-word directly from the Client, with little deviation tolerated.

During my research I found a interesting example of Educational Games that came about from contractors working for the Australian Institute for Disaster Resilience (AIDR), with direct funding from the Australian Government. The first was ‘Dingo Creek‘, a web-based game designed to immerse middle year students in natural disaster education in an Australian context, Dingo Creek is designed to engage students in:

  • Identifying the risks natural disasters pose to their immediate community.
  • Using the emergency risk management process to reduce the impacts of natural disaster on the Australian environment.
1
‘Dingo Creek’ revolves around Water Preservation & Ecological Protection, and was contracted by the AIDR.

As with many Educational Games, the content and message of Dingo Creek is concisely mapped to state and territory curriculum frameworks. Regarding the contractors themselves, all I was able to determine was that they were externally sourced and employed for the duration of the game’s development. Ongoing hosting of the game in the case of Dingo Creek however was managed by AIDR, not by the contracted developers.

2
‘Before the Storm’, an educational app designed and contracted by the Australian Government to teach about Storm Preparation.

Another Educational Game with a similar purpose and also developed by externally sourced contractors was ‘Before the Storm‘. Before the Storm is an education product from the Australian Emergency Management Institute’s (AEMI) School Education Program, in support of the COAG National Strategy for Disaster Resilience. Based on the Government’s Severe Storm Action Guide, this free educational iPhone/iPod touch game is designed to assist students (aged 10 -15 years) and their families become better prepared for what to do before, during and after a major storm.

Unfortunately, due to the nature of many Government Projects, once these projects were completed, the contractors were released without any real possibility of continued work. However there are Developers in the marketplace whose business model is centred around providing Contract work for Educational Games. By focusing on Educational Games, they tailor their approach to meet the needs of Clients who require Games that can teach and inform. Two of the most interesting I identified during my research were ‘Games Gurus’ and ‘Fun Atomic’.

From concept to creation, Game Gurus is a full stack developer of games for smartphones, tablets, and all connected devices. They build games for players to learn about Newton’s laws, corporate leadership, anatomy, or simply to entertain Players with visually impressive art that engages and immerses Players. Fun Atomic develop high-quality educational and serious games that balance a mix of education and entertainment. The primary platforms they use are Unity and HTML5, meaning they can tailor their work across multiple platforms and devices with relative ease.

What both of these Developers do exceedingly well is market and sell themselves as professional contractors for creating Educational Games. They each showcase a detailed portfolio of existing work, and they invite companies to submit their projects directly. With a polished and successful body of work under their belts, they also have the opportunity to gain future contracting work from the companies who contract them for initial projects. What each of them also offer is not only the design and production of Educational Games, but ongoing technical support and maintenance (depending of course on the specific arrangements organised in the initial Contract).

Something else I learnt during my research is that not all Educational Games or their Developers started off that way. Although it didn’t begin life as an education game, Minecraft is amazingly good at fostering creativity and engaging Players. With both these traits, it is hardly surprising that Microsoft and Mojang were able to identify the potential for a spin-off Game that could be tailored to meet the needs of the Education Market. This task would eventually lead to the development of Minecraft: Education Edition. It takes the familiar Minecraft experience and adds a collaborative element. Students can work together in teams to solve problems, while in-game tools make it easier for teachers to monitor and help them with their projects.

Studio 3 – Choice in Games

Choice in Games is what Games are all about. Its interactive nature and how it involves the Player in the process through the element of choice, are what makes Games a unique medium for content creators. Part of this choice is allowing Players the opportunity to fail, in essence Players need to be able to make mistakes, and they need to be allowed to fail. And although our Game is not your typical kind of Game, the same holds true for ‘Flow‘. That’s not to say success isn’t important, but it is through how Players can make mistakes that can then learn from them.

This view was reinforced from our very first Client Meeting with Arkshay, who supported and encouraged the development of an application that allowed Players to not only practise with Signal Flow, but make mistakes and learn from them in the process.

In our Game Design for ‘Flow’, we had created 10 individual stages that each involve practising a specific part of Signal Flow, with each subsequent stage either introducing something new, growing in complexity, or both. The Nodes in each level are all already in place, but the paths between those Nodes are void. It is entirely up to Player as to what step they first take, even if the level has only a single very specific solution.

By giving them the freedom to choose, the Player can start by making an initial connection between say a Microphone and the Junction Box, but beyond that they can attempt to connect whichever Nodes they feel like. They can attempt to link Nodes in a logical pattern in an effort to meet the Level Description for the stage, or they can experiment and attempt connections that had never considered before. They can even go the path of process of elimination by attempting to connect Nodes together until they find a solution. This solution may not be elegant or efficient or even practical, but the point is that the Choice Design behind ‘Flow’ specifically allows for it.

Some Nodes will not connect together, but this has more to do with the rules of the system rather than limiting Player choice. This is because some hypothetical choices are simply impossible (eg. a Microphone connecting to another Microphone, a Microphone connecting straight to a Channel Fader, etc) and will never occur in a Studio environment under any circumstance. While some might argue that because our application is a safe alternative to a Studio that it might have been prudent to include such possibilities, but I believe we made the right choice of balance between freedom and usability.

We do however give the Player the choice to change and undo the actions they take in ‘Flow’. In the game, if the Player makes a connection between two Nodes and realises that they have made a mistake, rather than starting the level from scratch and loosing all their progress, they can simply right-click on a connection and delete it. They can make and break connections between Nodes without penalty, giving them room to experiment in each new level they come to.

Something we did notice during development and testing was that when Players became stuck or wanted to start again on a stage, they were forced to go all the way back to the Main Menu in order to access the Level Select screen and begin the level again. The easy solution to this problem was a add a ‘Restart Level’ button to the corner of the UI in each level. That way, if Players found that their Signal Path wasn’t working out, they could start again with just a single click of the mouse. This was the kind of solution to a problem that was born out of not just necessity, but convenience as well. Not only would it allow Players to restart a level quickly, it also benefited Designers and Programmers alike during Testing.

Beyond these, there aren’t too many other ways that Choice Design is implemented in ‘Flow’. Players may be able to select the level they wish to play (given they have unlocked them), but other than that there are no other real choices that the Player can make. In the game they are bound by the rules of the system and can only create a Signal Flow loop that falls within these rules. There are no out-of-the-box solutions or ways to cheat the system, but this fact is down to the reality that we are creating an application that serves a very specific purpose. For the Win Condition for each level, the Signal Flow must either check off or pass through the Nodes required by the game, otherwise the Player will be unable to progress. It may seem strict, but these are the exact same kinds of requirements made in the Signal Flow exam in the early Audio trimester unit.

The goal of ‘Flow’ is to give Players a platform with which to practise practise practise Signal Flow, and within the bounds of that system they are free to make whatever choices they see fit.

Studio 3 – ‘Flow’ and Testing

As with the development of any game, ‘Flow’ underwent periodic Testing in order to adapt and refine the design of the game based on feedback and observation. However, unlike many of the projects undertaken before in Studio units, ‘Flow’ was not subjected to what you would call a traditional testing plan. With such a unique concept and compressed development life-cycle, we were forced to improvise in our approach to testing. What we came up with was something quite different to previous projects, and actually served a greater purpose than merely testing.

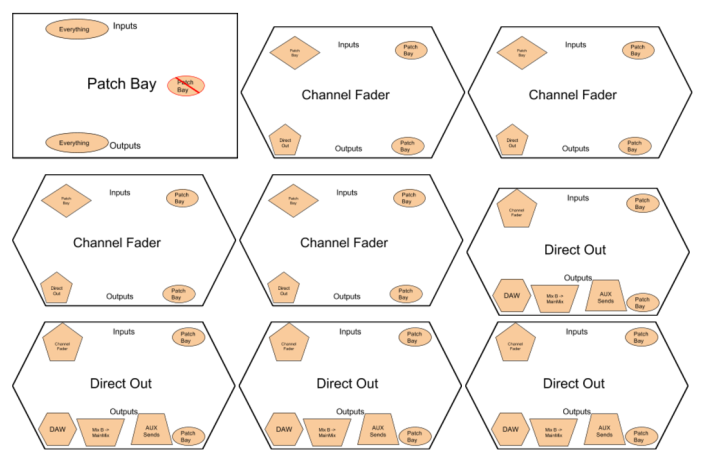
When we first handed over our initial prototype in Week 6 to the Programmers, we found that they struggled to understand the basic concepts of Signal Flow behind the game (or application). They didn’t have the earlier Studio access we had through Ash, and although we attempted to walk them through the processes involved, it quickly became clear that we required a middle tool to help bridge the gap in their knowledge base. We needed something physical that could be used to walk them through Signal Flow step by step, but also resembled the prototype we had provided to them. Primarily conceived by Noah, and tested by the entire Design Team, we came up with a system of Visual Aids that would later come to be know as ‘Flominoes‘.

flow1
A selection of Node cards from the latest iteration of ‘Flominoes’.

A portmanteau of ‘Flow’ and Dominoes, ‘Flominoes’ are a series of tile-cards we created to represent each of the Nodes that make up every piece of equipment used in a typical Studio. Initially they were simply titled cards, used in iteration with the Signal Flow handbook provided to us by ash, that we could use to show on paper to the Programmers the path of audio in a Signal Flow loop, governed by the rules that each Node had to abide by. However, as development progresses these Flominoes went through a number of iterations that would eventually lead to them becoming a side-project that would grab the attention of the Client.

In its current state, Flominoes has gone through 5 and half major iterations, with each new version serving as more refined and accurate revision of Signal Flow represented on paper. Although Noah took the lead in the development of Flominoes, each Designer took part in testing at least one iteration of the tool. I for one tested the second iteration of Flominoes, running through Signal Flow level examples in an attempt to discover any potential deficiencies. Minor confusion was discovered in determining which Nodes could connect to one-another, an issue that would be addressed in subsequent iterations by the inclusion of symbols for easy recognition of Nodes and the clear separation between inputs and outputs.

With this tool in hand, it became far easier to bring the Programmers up to speed on Signal Flow functioned on paper, and allowed us to translate a design of a Signal Flow loop on paper into a Unity design with much more relative ease. Using a White-board or even the Floor (later iterations had string links between Nodes), an entire level for ‘Flow’ could be laid out and reassembled with very little difficulty. Changes could be made on the fly, with potential problems sometimes able to be anticipated before any work was done in Unity. Levels could be troubleshooted with Flominoes and redesigned by hand. Nodes could be dropped in and taken out, and channels became far easier to visualise when they could be physically separated into groups of linked cards.


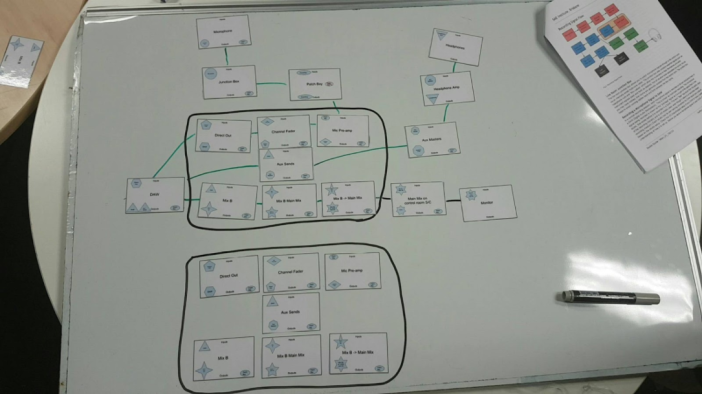
EXAMPLE OF FLOMINOES IN PRACTISE: Level 2

For Level 2 in ‘Flow’, the design layout consisted of one Microphone, however there are two different channel groups, one of which consists of a broken ‘Mix B to Main Mix button, pre-setup when the level loads. The objective of the Player is to determine which grouping works and then complete the signal path normally.

flow2.png
Pre-setup of Level 2 in earlier version of Flominoes.

This layout in Flominoes shows the layout of the Signal Flow as it exists when level 2 begins. It is then up to the Player in ‘Flow’ to correct the situation by identifying the broken Node.

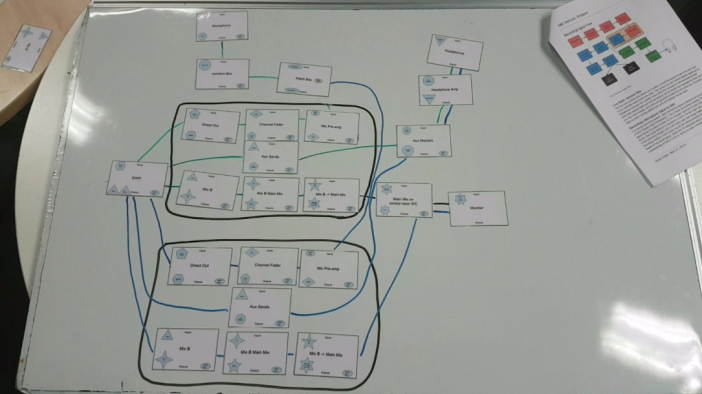
flow3
The intended solution for Level 2 in earlier version of Flominoes.

In the image shown above, the solution to level 2 is laid out, with both channels utilised and the links between Nodes colour-coded based on their channel. Broken down, the solution is for Players to utilise the additional channel to route around the broken Node. With Flominoes, we can visually identify where each Node is, what it is connected to, what it can connect to, what channel it is a part of, and at what stage in the Signal Flow it is used. With each of these elements easily identifiable at a glance, we were able to troubleshoot each level quickly and effectively, allowing the design of each stage to rapidly iterate.

In further testing, the Patch-bay, which was by far the most troublesome and complex Node during development, was much easier to understand and interact with thanks to Flominoes. Armed with this, the design of several later levels (8, 9 & 10) were re-engineered to address faults related to how Signal Flow was handled by the ‘DirectOut’ and the ‘Master Mix B’. With these issues identified on paper, considerable time and effort was likely saved further down the line in Unity. Issues regarding the number of inputs and outputs available to each Node were also identified and resolved using Flominoes.

While it was never originally intended to be, Flominoes actually turned out to be a rather interesting side effect of the development of ‘Flow’. In many ways it turned out as the physical version of ‘Flow’, one that can interacted with by hand and stepped through in rather the same fashion, although without the visual feedback present in ‘Flow’. In another way, it turned out as a potential teaching tool, one that Arkshay and other Audio Staff members have expressed an interest in taking further. Like with ‘Flow’ itself, it too has the potential to be turned into a commercial product.

It also has the very real potential to function as an early trimester teaching aid, one that students being introduced to Signal Flow for the first time could greatly benefit from. Not only is it simple to produce and easy to pick up and understand, its very nature of development makes it an ideal companion piece to ‘Flow’ as a tool for practising Signal Flow. Whether or not the idea of Flominoes is taken forward from here, the potential remains regardless.

Studio 3 – Project Methodology

From the beginning of the project this trimester, our client Arkshay made it very clear that what we were developing wasn’t a game or application ready for commercial release, but a ‘proof-of-concept’ that could be taken further. It is something that would that would be developed over the course of the trimester, in the hope that the product at the end could be taken further and potentially commercialised down the line. With this goal in mind, and the fact that no-one had created an application quite like what the client wanted before, we set about finding a Management Methodology that met the specific needs and time requirements of our project.

It would need to be a Methodology that would allow for a prototype to developed by the Designers, delivered to the Programmers in Week 6, and then redeveloped by the whole team again and again until the final delivery date. With the added requirement that prototype builds be available to show to the client at multiple points during the development life-cycle, the Methodology we would eventually use was quickly narrowed down to ‘Prototyping‘. The Prototyping Model is a systems development method (SDM) in which a prototype (an early approximation of a final system or product) is built, tested, and then reworked as necessary until an acceptable prototype is finally achieved from which the complete system or product can now be developed. This perfectly met the needs of our final product, as well as the ongoing needs of our client throughout development.

Our approach to Prototyping would be a mix of ‘Evolutionary‘ and ‘Throw-away‘ Prototyping, utilising elements of each. With ‘Throw-away’ Prototyping a small part of the system is developed and then given to the end user to try out and evaluate. The user provides feedback which can quickly be incorporated into the development of the main system. The Prototype is then discarded or thrown away. This is the situation we engaged in with the Week 6 Initial Prototype that was delivered to the Programmers. It was intended to give them a Design overview of our game that they could use to gain an understanding of the underlying systems they would be required to build, and could then be simply discarded when they were finished with it. With Evolutionary Prototyping, the later subsequent builds of the game would be iterated upon based on feedback from the client, with changes then actioned by us in order to develop and present to them a more refined Prototype later. This process is repeated for as long as development continues, right up to the delivery date.

With the final goal of the project being what it was, and the kind of project we were developing with ‘Flow‘, our selection of Prototyping was hardly a surprise, especially to me. Utilising a rigid SDLC (Software Development Life-cyle) such as Waterfall simply wouldn’t have fit the needs of our project, thanks to its sequential and non-iterative design nature when handling change. We needed a Methodology that like Agile is an alternative and flexible software development model, compared to more rigid systems of management that are quickly becoming antiquated.

Although there are slightly different implementations of Prototyping, or other Agile-based Methodologies we could have potentially utilised in this project, I feel that our selection met the specific needs and requirements set by the client as we saw them.


Studio 3 – Specialisation

One of the objectives of Studio 3 this trimester has been for Game Design students to work on a Specialisation in their discipline, honing their craft on a particular area of Game Design as a subject. This work was intended to sprout from the discussions each of had with Adrian Forest during our TSSK Meeting in the middle of the trimester, however this leaves me with a minor dilemma; during my meeting the subject of Specialisation never came up.

Despite this omission, I decided to forge ahead and choose a Specialisation for myself, an area of Game Design I could experiment with on the side, whilst working on my Studio 3 project. After some minor internal debate, I decided to choose an area I had always found fascinating, yet had never developed in the slightest myself. I therefore decided to focus my Specialisation on Cinematic Elements in Unity, a subject I went in knowing absolutely nothing about. Although daunting, I knew that the challenge it posed would provide me will skills needed in order to stand out in the industry as a talented professional worth hiring.

Development Preview video for ‘The Red Planet’ on YouTube.

A key advantage of focusing on a Specialisation in Cinematic Elements is that is happens to tie in nicely with the development of ‘The Red Planet‘, a first-person exploration survival game I am developing in Unity. The Red Planet is an immersive and atmospheric game set on Mars, with a focus on realism and environmental interaction, however it has until this point lacked a certain Cinematic quality. Development up till recently has been focused primarily on the Mechanical side of affairs, how it has always been my intention to blend the Cinematic Elements into the final polished product. This Specialisation this trimester has simply warranted me the opportunity to explore this side of my project whilst also fulfilling my LOs for Studio 3, a welcome and valuable opportunity to say the least.

giphy
Quick Intro Splash for KAZ Productions.

What I set out to achieve was to create an scripted Introduction Sequence to my game, complete with Effects and Audio, essentially an-engine cinematic that introduces Players to the opening level, setting the stage for the rest of the game. In order to achieve this goal, there were a number of objectives I needed to meet. These included the following:

  • Creating Conceptual Design Storyboards on paper.
  • Creating a Script of Events, including Timings and Sequences clearly defined.
  • Modelling 3D Assets and creating 2D Art Assets from scratch.
  • Sourcing all remaining 2D & 3D Assets.
  • Reaching out to Audio Collaborators for a Musical Piece to back my Cinematic.
  • Creating Camera Rigs in Unity, with scripting to control their movements.
  • Creating a Interactive & Dynamic Main Menu to cap the entire loop.
giphy (1)
Animated Main Menu, showing ‘Atlas’ orbiting Mars at sunrise.

Creating my initial Conceptual Designs took longer than anything else. I took inspirations from a multitude of sources including cinema, games, and even my own experiences flying. I wanted to create a cinematic that felt futuristic yet retained a sense of realism, breaking no laws of physics in the process. It would slow paced, giving the Player only what they need for a basic understanding of their mission and current situation, and most importantly it would not give away any potential plot elements that could spoil the game. For this reason, set pieces and characters are kept to a bare minimum.

giphy (3)
Extended panning shot of the ‘Atlas’, approaching Mars Orbit.

The Player understands that they are part of a Supply Mission to Mars, and that they are a crew member on the ship ‘Atlas’. They know the basic outline of their mission timeline, as well as the fact that contact with the Hyperion Colony has recently been terminated. It is made clear to them that their mission has changed to one of  search and rescue, rather than the typical science and supply mission they set out for. The cut-scene showcases various external elements of their vessel (showcased in different Camera angles), as well as the lander they will use to reach the surface in. It is shown detaching from the Atlas as the final Camera movement pans upward whilst moving backward to show the Atlas on it’s final approach with the planet Mars. The Camera then begins to glitch as the screen fades to black.

Soundcloud.png
Eric Margolin’s Soundcloud page.

On the subject of Audio, I intentionally avoided using any kind of sound effects during the Cut-scene, focusing instead on a single Audio Track. This is because I wanted the Music of the scene to drive the experience, in the same way director Stanley Kubrick used orchestral music to drive space sequences during ‘2001: A Space Odyssey‘. Although I considered composing a simple piano piece myself at first, but instead opted for an ambient instrumental piece called “The Mystery Unravels“, by composer Erik Margolin. With this piece, and Erik’s blessing to use his music, in hand, I spent days listening to it over and over as I crafted my Conceptual Design for the Cut-scene, letting the flow of the music and the individual melodies influence everything I could. Eventually a flow of events began to take shape, and then evolved into the entire sequence that can been seen in the final product.

giphy (4)
Pulling away shot and 90 degree turn as Mars comes into view and the Shuttle detaches.

Regarding Cameras in the Scene, I had to come up with a number of systems to create the flowing experience I wanted the Cut-scene to portray. This meant I needed to create a series of Camera Rigs, a GameObject that could be used to hold, move, and manipulate my Cameras, not to mention a system of smoothly switching between and managing multiple Cameras at once. All these Cameras also had Post-Processing Effects applied to them, while some of them also had custom effects and actions assigned to them that would trigger at a specific point in the scene. I made extensive use of Coroutines and IENumerator functions in the scripting for managing cameras, as well as for other events that required triggering in the scene on a second to second basis. While I certainly wouldn’t use them for everything, they came in very handy for managing events that need to occur at a specific point in runtime.

ScreenSelector
Current Development Preview logo for ‘The Red Planet’.

Coming away from this exercise, it is clear that I have learnt a lot. I’ve learnt to build the tools I need to accomplish what I need to do in Unity, and I have a much greater appreciation for those developers who continue to develop in-engine cut-scenes, instead of leaving everything to CG. I plan to take what I have learnt here further, taking what skills I have learnt and putting them to use in my future career projects, and well as in my own personal works. This includes refining them as I continue to develop The Red Planet into a fully-fledged game that will eventually see a release to the public.

Snippet.png
Development screenshot of the Cut-scene during development in Unity.

The Red Planet is currently in active development and scheduled for release in early 2018. In the coming months I will be releasing a number of further Development Previews, and will be conducting in-game Play-testing in Q4 this year. Until then, I will be ramping up my presence on Twitter and other Social Media in the coming weeks, and will posting surface game-play within a months time. Development is actually considerably far along, but I want to hold off on what I show off until I feel it is ready.

Studio 3 – Audio Design for ‘Flow’

Over the course of Studio 3 and the development Signal Flow application this trimester, I have assisted in the design of multiple areas of production. Although I was an active and engaged participant during the initial Conceptual Design of the project, as well as building out the User Interface elements for the initial prototype, in no area was I more involved than the Audio Design for ‘Flow’.

Initially Audio was given little attention, despite the entire project revolving around it. By Audio, I am referring to Audio Elements such as button sounds and SFX that occur when specific interactions were triggered. Audio in the form of music was ruled out early on in the project, due to the belief that it would distract from the experience. After all, the goal of the application is to provide a tool for students to practise the concepts of Signal Flow, not create an environment that entirely mimics or replaces a Studio Console. Audio wasn’t given much thought until after we delivered our initial prototype to the programmers, after which it was a task that assigned to me as a Designer.

I began my work on the Audio Design by setting about building an AudioManager to handle the calling of AudioClips and stored AudioSources in each Scene. While this process was progressing, despite a few speed-bumps, Bailey actually took the time to create a new custom Audio Manager himself, one that was much simpler and easier to use than my own personal implementation. I was actually rather thankful for this, as his implementation possessed a number of advantages over my own. I was so impressed by its simplicity that I have actually taken the time to rebuild the AudioManager for a personal project I am working on to better reflect Bailey’s implementation. Bailey’s AudioManager did however require some minor reworking, as his PlayClip() function would fail to add an AudioSource to a gameObject, causing the rest of the function to practically stall. Eventually this issue and a number of other problems would all be resolved.

The AudioManager was a single Script attached to an empty GameObject that could be used as a Prefab and dropped into any Scene as needed. It was setup so that only a single AudioManager would be needed per Scene, and that no AudioSource would need to exist anywhere on the Hierarchy, instead they would all be created and destroyed on the fly as needed from within the AudioManager and the Inspector. Each Sound in the Game would be called with a single line in a Script that drew from AudioManager, which would create a fresh Instance of AudioManager. This Instance would create a fresh AudioSource, grab the appropriate AudioClip (which could be assigned in the Inspector), set the Volume, and assign the AudioClip to a specific Channel (although Channel implementation in Audio would only progress up to a point during development due to other more immediate concerns). The Clip would then Play and would be destroyed when complete.

All this method required was that each Scene had an AudioManager, and each Prefab in the Scene that held either the aNode.cs or aPatchbay.cs Script had an AudioClip assigned to it in the Inspector. By assigning the AudioClip to each Prefab, this removed the time consuming need to setup the Audio Elements on each object in each individual Scene, a long process when considering the fact that the application contains more than 14 Scenes. One issue that did continue to occur was that when the Prefabs for Nodes in the Scene were updated (eg. new Sprite added, resized, script changed etc), often the AudioClips would reset in the Inspector, required each Prefab to be inspected and reconfigured as necessary. Although this was hardly the end of the would, it became tiresome by the end.

I still had to resolve a number of issues related to scripting for Audio. Volume was persistent problem early on, stemming from an issue with the Channel Volume. This would be sorted by manually setting the Channel Audio higher than its default value. A great deal of Audio Elements also could not be properly implemented and tested until their dependant Game-play Mechanics were functioning, causing considerable delays.

In the end, I would have to setup calls to create an Instance of AudioManager across multiple Scripts, setup to trigger when specific events are triggers or conditions met. These Scripts include GameManager.cs (set to trigger the Victory Sound when the Win Condition is set to TRUE), BetterSceneManager.cs (set to Trigger when the Scene changes), LineRendCol.cs (set to occur when the Line Connection between Nodes is destroyed or a successful connection between 2 Nodes is made), and a dozen more Scripts.

Unfortunately, I would also have to re-implement all the Audio Scripting manually when the decision was made to move from the Designer’s Repo to instead work from a fork of the Programmer’s Repo. Because of this, a number of unforeseen problems were encountered during this move, due in part to the slight differences in our codes bases, taking the better part of a day and a half to resolve.

Our Audio Collaborator Pitch Video for ‘Flow’.

Moving away from scripting and working in Unity altogether, I was also set the task of recording an Audio Pitch Video to pitch to potential Audio Collaborators. While we had expressed high hopes that this process would be successful in attracting interest from Audio Students, a lack of responses meant that I was forced to source an Audio Collaborator personally.

assetlist.png
Our Audio Asset List for ‘Flow’, provided to Misty-lee (our Audio Collaborator).

Thankfully Misty-lee, a Tri 5 Audio Student, was available on short notice to create a series of Audio SFX Elements of a more professional calibre than the temporary Sound Effects I had made in BFXR. This required me to write an up-to-date Audio Asset List and deliver it to her that same evening. She graciously got back to us the same evening, and in only a few short days she managed to deliver all the Sound Effects we requested. I was then able to implement them in the project shortly after.

Studio 3 – The Implications of Our Craft

As creative professionals, we often find ourselves having to justify and understand the greater implications of our individual approaches to Game Design. Whether we realise it or not, consciously or not, the decisions we make in the games we create can have serious implications to the audiences who play them.

In Studio 3 this trimester I have only had the opportunity to work on a single project, and one that falls somewhat outside the realm of what could be considered a Video-Game. ‘Flow‘ may be built in Unity, but it far closer resembles a learning tool than any traditional Game. Its Ethical and Social implications are also practically non-existent, however it does retain some Economic implications from our point of view as Game Designers. As a ‘product’ that will eventually be delivered to our Client, ‘Flow’ does have the potential to evolve into product that could easily be sold or licensed on a per-head basis.

The Economic implications of this are that we as developers need to be keenly aware of not only our responsibilities as Designers towards our Clients, but also our own value as Game Designers. I value both my work and my time, and am fully conscious of the need to protect my own interests. I know that there are those out there who would gladly take advantage of me in the industry, and I in turn know that in order for my work to take on financial value then I need to attach a monetary value to the work and effort I do. This was reinforced this trimester by turning our attention to the subject of Contracts, and the need to have both Business & Financial Arrangements sorted out legally on paper. While the contracts we were exposed to were relatively simple and free of legal-ese, they can potentially serve as a framework for more complex projects further down the line.

In Final Project this trimester, the project I am working on has a wide range of potential implications related to Game Design. As a commercial product that will eventually be marketed and sold to the general public, there are Economic implications as to how we value the work we have created and where we price ourselves in the marketplace. Conservative in our estimates of what we believe Players would be willing to pay for our final product, we have valued ‘State of Mind’ at a starting price of US$5.00. This price point ensures that we are able to reach a wider audience of Players, whilst also fairly compensating ourselves for the work we have put in. This estimate was determined in part by studying the average cost of Indie Titles put up for sale on both the Steam and itch.io Storefronts.

som
‘State of Mind’ is a game that deals with the subject of Depression and Grief, and one that has deep Ethical and Social implications.

In addition, there are both serious Ethical and Social implications related to the Game Design approach for the game. ‘State of Mind’ tackles the subject of Depression, a subject not often explored in mainstream games, and one that has a real social stigma attached it. Being such a serious subject matter, our game has gone through numerous conceptual design iterations, more than most other projects this trimester. Although this process has been lengthy, it was done in a concerted effort to ensure that we got it right before we made the move to full-production. We wanted to design a game that approached Depression in a respectful and dignified manner, without the risk of trivialising or falsely portraying such a critical subject matter. The Ethical and Social implications of failing to address this appropriately are immersive, and include the risk of both alienating and victimising those people who have suffered or continue to suffer from Depression.

Beyond the games we ourselves create, we can observe these kinds of implications in other games currently on the market, two of the most noteworthy examples being ‘Grand Theft Auto V‘ and ‘Hatred‘. While both games were commercially successful, they were each treated differently in the press based on their design decisions and the wider implications of their individual approaches. Both contained depictions of violence, however each of them sought a  radically different approach in order to solicit the attention of Players and the wider public alike.

gta-v-box-art.jpg
GTAV’s America, a violent yet accurate satire of everything that makes America the envy and mockery of the rest of the world.

In the case of GTA V, Rockstar Games sought to hold a mirror up society, creating a parody of the underworld of American Life and the American Dream. While some see the GTA Series as nothing more than murder simulators that glorify violence, it is in reality so much more than just a tool that the media can point to in order to explain away violence on the streets. It is in actuality a vast satirical take on the various complexities, problems, and attitudes that define everyday American life. Through an expansive world of people with interconnected relationships and situations, GTA V delivers the experience of a living breathing world that actually feels real.

VhjzEry.png
The ‘subtle’ difference between Hatred and GTA V (CAD-COMIC, 2015).

Because it feels real, it forces us to confront the issues that are depicted throughout the game. It tackles the subjects of wealth inequality, corruption, poverty, the circle of crime and violence that consumes those caught up in the criminal world, and so much more. And while some of the subjects it approaches are considered by many to be taboo, Rockstar Games have repeatedly shown themselves to be up to the task of challenging traditional ethical and social conventions in order to reach a wider audience. GTA V doesn’t just feature violence for the sake of entertainment, but because violence is woven into the everyday fabric of American Life.

1
An act of random violence against law enforcement in Destructive Creation’s ‘Hatred’.

‘Hatred’ on the other hand is a very different beast in its approach to Game Design. Despite their claims to the contrary, it is obvious even to the layman that Destructive Creations sought to profit from the game solely by stirring up controversy in its visceral depiction of meaningless violence. And unlike GTA V, the reasons behind these acts of violence are but naught, it is just violence committed for the sake of violence. It lacks any kind of meaningful message or agenda, instead acting as little more than a twin-sticks shooter that seeks to lash out at the more politically correct array of games that are becoming more common today. It tries and in my opinion fails to attract many Players by trying to come across as ‘edgy’, but instead can only resort to unrestricted violence that banks on shock value.

While GTA V is a game I would have gladly worked on as a Designer, Hatred is a game I would simply refused to be a part of. Not because of its depictions of ultra violence, but because of its goals and intentions as a project. It simply goes against my own ethical code of what is right as an acceptable approach to Game Design. If it had a ‘real’ underlying message that it was attempting to deliver, I might have been swayed, but lacking that simply cannot justify being involved with such a project. It’s only goal is to offend and grab fame through notoriety.

This is not an isolated example however. If in the industry I were to be put in a situation where I would be working on a similar kind of project, I would rather resign than work on a project that goes against my own personal Ethics. My Ethics may be able to stretch somewhat (I am willing to take on projects that go beyond my own Moral Code), but I know their limits and I refuse to compromise my own integrity as a Game Designer and consummate professional.


Addendum:

After writing the Post-Mortem for ‘Flow’, I find myself looking back and considering the possible Ethical Implications of ‘Flow’ if hypothetically the project were taken further. In its current state it is relatively harmless in of itself, but as a WebGL application it has the potential to become something more nefarious. This is a quick look at ‘What if?’, what if ‘Flow’ was used to track and monitor Players.

Something that was considered during development was the addition of a Save System that was based on a Player’s login details. While this would have the benefit of being able to draw save-data from the cloud, such a system could quite easily be reversed and be used in order to draw information from the Player’s end of the equation. Such a system could be setup to gather personal information from the Player, details could potentially include the following:

  • The Player’s Name, Email Address, Contacts, URL History.
  • Location Data, IP Address, Computer Name & Network Details.
  • Unencrypted Data, Photos, Documents, Emails.
  • Installed Applications, connected Hardware Devices.

With such an open door to gather data, such a system could potentially even be used to deliver Spyware to a Player’s device or computer system. And worse even still, a great deal of this could even be accomplished legally. By hiding these details amongst the bowls of User Service Agreements, most Players would sign off on such snooping without even realising. The sad reality is that this arrangement is nothing new, with the majority of apps on phones and other mobile devices requiring access to at least some form of personal data from the Player (eg. their Name, Email, etc).

While I understand and appreciate the need to gather some of this information (we live in an interconnected world after all, one in which directed marketing is king), there are limits to what I would be comfortable in being involved with. For any application or game I personally designed, I would only ever be comfortable with collecting information that the Player was consciously giving up, and information that is relevant and unobtrusive.

Outside of this situation, as part of a larger development team or corporation it is unlikely that I would have any kind of real sway in what information is gathered from Players. But despite this, if I were put in a situation where intrusive data gathering is a feature being implemented in a project I am heading or working on, I would still make it a point to voice my personal ethical objections in a direct and polite manner, even if such a feature is still to go ahead. That is just the kind of person I am, both personally and professionally.